Web Identity Federation with AWS Cognito
Overview and Definition
In this project, I will show you how to implement a serverless application that uses
Web Identity Federation.
For most scenarios, I recommend that you use Amazon Cognito because it acts as an
identity broker and does much of the federation work for you. For details, see the following
section, Using Amazon Cognito for mobile apps.
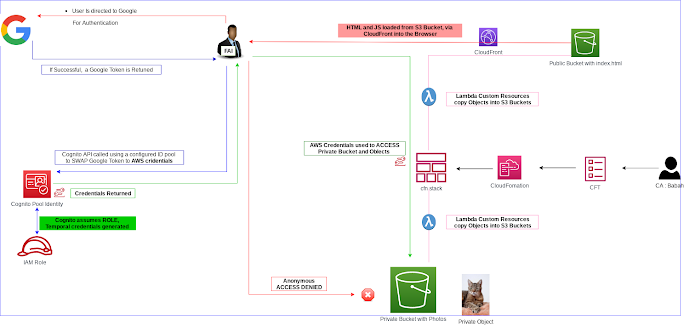
The application runs using the following technologies:
S3 for front-end application hosting
Google API Project as an ID Provider
Cognito and IAM Roles to swap Google Token for AWS credentials
Cloudfront for Edge Location
Cloudformation to setup the Environment
Web identity federation enables users of your application to sign in using a well-known
external identity provider (IdP), such as Login with Amazon, Facebook, Google, or any other
OpenID Connect (OIDC) compatible IdP without the need to create custom sign-in code or
manage your own user identities.
They can receive an authentication token, and then exchange that token for temporary
security credentials in AWS that map to an IAM role with permissions to use the resources in
your AWS account. Using an IdP helps you keep your AWS account secure because you don't
have to embed and distribute long-term security credentials with your application.
Project Execution
This Project consists of 5 stages:
STAGE 1: Provision of the environment and review tasks
STAGE 2: Create Google API Project & Client ID
STAGE 3: Create Cognito Identity Pool
STAGE 4: Update App Bucket & Test Application
STAGE 5: Clean up the account.
Let us jump right in...
Stage 1: Provisioning our working environment
At this beginning stage, I will set up the environment:
Two S3 buckets, one with public access containing the index.html and script.js files
Cloudfront distribution with the public S3 bucket as the origin; to achieve this,
Log in to your AWS console, and check the following buckets
Open the S3 console
Open the bucket starting webidf-appbucket
It should have objects within it, including index.html and scripts.js
Open the bucket starting webidf-patchesprivatebucket-Load the objects in the bucket so
Move to the CloudFront console
Stage 2: Create Google API Project & Client ID
Step 1: Create Google API PROJECT
You will need a valid google login, GMAIL will do. If you don't have one, you will need
Move to the Google Credentials page
You will be moved to the Google API ConsoleYou may have to set your country and
Click the Select a project dropdown, and then click NEW PROJECT. For the project,
Click Create
Step 2: Configure Consent Screen
Click Credentials and click CONFIGURE CONSENT SCREENbecause our application will
Check the box next to External and click CREATE
Next, you need to give the application a name ... enter PetID, in the App Name box,
Click SAVE AND CONTINUE, Click SAVE AND CONTINUE, Click SAVE AND CONTINUE
Step 3: Create Google API PROJECT CREDENTIALS
Click Credentials on the menu on the left, then Click CREATE CREDENTIALS, and
In the Application, type download select Web ApplicationUnder Name, and enter
We need to add the WebApp URL, this is the distribution domain name of the CloudFront
Click ADD URI under Authorized JavaScript origins and enter the endpoint URL,
Click CREATE
You will be presented with two pieces of information
Client ID
Client Secret
Note down the Client ID you will need it later, You won't need the Client Secret again.
Once noted down safely, click OK.
Stage 3: Create Cognito Identity Pool
Step 1: Create a Cognito Identity Pool
Move to the Cognito Console
We're going to be creating a new identity pool. If this is your first, the creation process will
begin immediately, if you already have any identity pools you'll have to click federated
Identities then click on Create new identity pool
In Identity pool name enter PetIDFIDPool.Expand Authentication Providers and click on
In the Google Client ID box, enter the Google Client ID you noted in the previous step.
Click Create Pool
Step 2: Permissions
Expand View Details, This is going to create two IAM roles: One for Your authenticated
For now, we're just going to click on Allow so we can review the roles later.
You will be presented with your, Identity Pool ID, note this down because you will need
Step 3: Adjust Permissions:
The serverless application will read images out of a private bucket created by the initial cloud
formation template. The bucket is called patchesprivatebucket. Move to the IAM Console
https://console.aws.amazon.com/iam/home?region=us-east-1#/home
Click Roles,Locate and click on Cognito_PetIDFIDPoolAuth_Role
Click on Trust Relationships and See how this is assumable by Cognito-identity
StringEquals Cognito-identity.amazonaws.com:aud your Cognito ID pool
ForAnyValue: StringLike Cognito-identity.amazonaws.com:amr authenticated
This means to assume this role - you have to be authenticated by one of the ID providers
defined in the Cognito ID pool. When you use WEDIDF with Cognito, this role is assumed on
your behalf by Cognito, which generates temporary AWS credentials used to access AWS
resources.
- Click permissions .. this defines what these credentials can do.
The cloud formation template created a managed policy that can access the privatepatches
bucket Click Add permissions and then Attach policies
Type PrivatePatches in the search box and press enter
Check the box next to PrivatePatchesPermissions and click Attach Policies
Stage 4: Update App Bucket and Test Application
Step 1: Download index.html and scripts.js from the S3
Move to the S3 Console https://s3.console.aws.amazon.com/s3/home?region=us-east-1
Open the webidf-appbucket- bucket select index.html and click Download & save the
select scripts.js and click Download & save the file locally
Step 2: Update files with your specific connection information
Open the local copy of index.html in a code editor,
Open the local copy of scripts.js in a code editor, and locate the IdentityPoolId:
Locate the Bucket: "REPLACE_ME_NAME_OF_PATCHES_PRIVATE_BUCKET" placeholder,
webidf-patchesprivatebucket- bucket Save scripts.js
Step 3: Upload files
Back on the S3 console, inside the webidf-appbucket- bucket, Click Upload, Add the
Step 4: Test application
Open the WebApp URL you noted down earlier, the distribution domain name of the
Open your browser web developer tools (firefox tool->browser tools-> web developer
With the browser console open, Click Sign In. Sign in with your Google account
When you click the Sign In button a few things happen: (watch the console)
You authenticate with the Google IDP, and a Google Access token is returned
This token is provided as part of the API Call to Cognito
If successful this exchanges for Temporary AWS credentials.
These credentials are used to list objects in the private bucket for all objects, and
Once signed in you should see 3 cat pictures loaded from a private S3 bucket
Click on each of them, and notice the URL which is used? it's a pre-signed URL generated by
the JS running in a browser, using the API which you can access using the Cognito credentials.
All of this is done with no self-managed compute.
At this point, you have a fully functional simple serverless application, complete with
Template front-end app bucket
Configured Google API Project
Credentials to access it
Cognito ID Pool
IAM Roles for the ID Pool
HTML and JS configured to access the Google IDP and Cognito
Comments
Post a Comment